Hello everyone!
Today is a Friday. And on Friday I usually think about what I’m going to do for the Monday Movie that I promise to deliver in a few days. This week, however, I realized that Depth of Field is a topic that a) wouldn’t compress very well in YouTube, and b) deserves more than 10 minutes. Depth of field is one of the many things you can use in your renders to add realism, meaning, and style. Like a lot of other features of 3ds Max, depth of field (DOF) requires tact and care to make a convincing and elegant result.
New: Take a look at my Depth of Field Monday Movie!
If you’ve ever done a lot of cooking you can relate to this. Everything tastes great with butter, salt, and pepper. I could serve you a fried brick and it would taste awesome! What separates the good chefs from the great ones is knowing when and how much fat to use to keep everything in balance.
Let’s start with this image below.
You’ll notice that I didn’t use any depth of field at all. However, there are already a lot of visual clues that tip you off that these teapots aren’t huge. The scale of the materials (such as the wood on the floor) are reasonable for ordinary sized objects. The baseboards along the bottom of the wall in the background gives you another clue since those are rarely taller than a few inches. I’m not relying on depth of field to be my scale queue, but instead to be a part of the greater image.
Mental Ray
Let’s add depth of field to this scene. The first thing to consider is what should be in focus. In most cases, it’ll depend on what’s most important. Below you’ll see two examples of renders with different focal points. In the left image, we’re focusing on the boy teapot and the heart, while in the right image we’re focusing on the girl teapot and what she sees.
I accomplished this effect quite easily. Instead of rendering with the perspective viewport, I hit Ctrl + C which is the default hotkey to create a camera in the active viewport. The camera thus created has a group called “Multi-Pass Effect” in the modify panel. When enabled, and set to “Depth of Field (mental ray)”, this setting will give you the depth-of-field effect. The way I shifted the focus of the shot was by changing the target range of the camera. This spinner is found just below the “Multi-Pass Effect” group. Try twiddling this spinner a bit, and you’ll see the camera’s “target” moving, indicating the distance at which objects will be in focus.
Now you’ll notice that the effect is pretty strong in both images. This is because the f-stop is set to only 2.0 by default in 3d Studio Max. If you’ve taken photography classes or done photography tutorials, you can skip this paragraph. A camera’s f-stop is a measure of how large the camera’s aperture is, where smaller numbers mean a larger aperture. The aperture of a camera is how big the ‘eye’ of the camera is and it determines how much light to let in. Without going into the details, know that a smaller aperture (larger f-stop value) means more of the image will be in focus.
As a visual demonstration, the three images below show differing f-stop values for the camera in this scene. To be explicit, each teapot is about 6″ in diameter.
These show varying degrees of blurring. The first image is so blurry we can’t see much of anything. The second image gives us an idea, but it’s still too muddy to make out what the scene is about. The final image makes gentle use of depth of field to convey scale and still make the scene’s objects clear.
Below is a larger render of that third image. The effect is still a little too high for my taste, but I think you get the idea about using Depth of Field in 3ds Max with subtlety.
Scanline
Now that you know how to create depth of field in mental ray, learning it in the scanline renderer is a breeze. Unfortunately, all of my materials were mental ray materials and my light was a mental ray light so I won’t be including quite as many pictures in this last section.
There are several ways of setting up depth of field in the scanline renderer in 3d Studio Max. On the one hand, you could use a similar method as we used in the mental ray renderer version. You’ll create a camera using the Ctrl + C method or by creating one manually, and under the “Multi-Pass Effect” group you’ll enable the “Depth of Field” effect. When you render, however, you’ll notice that it uses a very primitive method for creating depth of field, and this is generally not recommended.
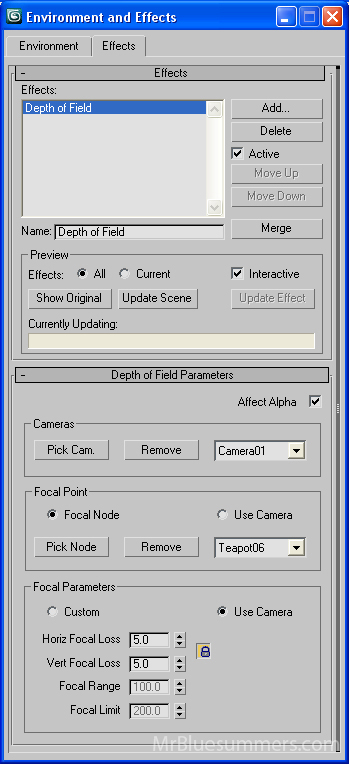
In scanline your best bet is to use the render effect found in the environment and effects panel (hotkey ‘8’ and shown on the right with final values). Open this panel and click on the “Effects” tab. Under the “Effects” rollout, you can click “Add…” and select “Depth of Field” from the menu. You will now have to select your camera using the “Pick Cam.” button, as well as select the object you want to be in focus with the “Pick Node” button.
If you render, you will now see that you have the depth of field effect, but it probably won’t be properly adjusted. You can alter the severity of the blurring effect by altering the focal parameters at the bottom of the Effects window. I’ve found that using the “Use Camera” mode and keeping horizontal and vertical losses equal works best (as shown).
In the end, the scanline renderer is actually more complicated to use than the mental ray depth of field settings. I hope this primer has been of use to you, and helped to demystify depth of field in 3d Studio Max. Just remember; subtlety, rather than know how, is the key to using this tool to great effect!
Until next time, happy rendering.


By MrBluesummers.com » Blog Archive » Depth of Field Primer Now Up December 6, 2008 - 2:33 am
[…] you in a few days for another Monday Movie! Click Here To Read More! Category: Blog You can follow any responses to this entry through the RSS 2.0 feed. You can […]
By Depth of field Test with Mental Ray - 3D-Palace Community Forums May 10, 2009 - 3:26 am
[…] Tsukiyono! I think he is refering to this one 3dsMax Depth of Field Primer Tutorial | MrBluesummers.com A very good book you might get is "rendering with mental ray & 3ds Max" by Joep van […]
By nxbooster April 7, 2012 - 3:28 pm
this is really useful tutorial. thanks a lot