I was thinking hard about the 3d Studio Max clay rendering tutorial I wrote a few days ago, and was pondering about what an extension might be. Then it struck me! “Gosh, wouldn’t it be cool to have a button in the 3dsMax interface that you could click, and have it automatically turn out a clean render while you go make a sandwich?”
The answer is “of course”!
So let’s have a look at that. What kind of 3d Studio knowledge would we need to take that on? Well, first we need our trusty Maxscript help file (Help > Maxscript help…) and a then a healthy dose of patience. Note: While I was writing and coding for this tutorial, I hit a few snags myself, so don’t think that it’s always a piece of cake. I’ll clue you in to some of my difficulties along the way so that you can learn from my mistakes!
Step 1: Copy the basic macroscript code.
Now this is a good step 1 for any project you take on in Maxscript. For this case, you can either copy my code below or you can go into the document and search for it yourself. I’d recommend finding it yourself (or better yet, typing it in manually) because it’s a better learning experience. However, I won’t hold it against you if you want to copy it- just this once.
macroScript Clay_Renderer
category:"Custom"
tooltip:"Take a clay render"
buttontext:"Clay Render"
(
)
Let’s run through the lines of code so we get a good grip on what it means. The first line declares everything inside as a macroscript, and gives it an internal name. The category string lets 3d Studio Max easily group it with other user interface items so you can put it in the toolbar or in a modular toolbar later. The tooltip is what appears when you hover over the macroscript button when it’s in the user interface, and the button text is what the button says on it.
Step 2: Think.
Inside this codeblock, we need to put what will happen when a user clicks on it. What’re some things we want it to do? Well, hopefully you’ve read my last tutorial, so you have a good grip on the ins and outs of clay rendering. We know we want to a) apply a white material to everything in the scene, b) have the scanline renderer in charge, and c) use a skylight.
I’d like to take a theoretical aside here and talk about a major hang-up on this particular script. You’ll notice that we’re messing with the materials in the scene and the lights. These changes need to be undoable or they’ll ruin everything. Can you imagine if you took a clay render and it took all your materials off your objects? Or if your lights disappeared? I’ll be including bits of code from here on out that help make this script more applicable and safer for scenes with materials and lights already in them!
Step 3: Lay down the foundations.
macroScript Clay_Renderer
category:"Custom"
tooltip:"Take a clay render"
buttontext:"Clay Render"
(
	undo on
	(
	  -- Create a white material and assign it to everything.

	  -- Delete all the lights and create a skylight instead.

	  -- Store the current render settings, and set to scanline.

	  -- Render

	  -- Revert to the old renderer
	)
	-- Undo everything we did, leaving only the render.
)
So I’ve only made a single structural change here, which is adding the “undo on” wrapping. This makes it so that the entire macroscript takes up only a single block in 3d Studio Max’s undo history. This way any changes made within this codeblock can be undone with a single command. Neat huh?
The remaining stuff is all comments. I usually start my scripts off by hammering out comments that say what needs to get done. I recommend that you consider doing the same; it helps you stay organized and think things through. In this case, you see we need to create a white material and apply it to all the objects in the scene. Then we need to delete all the lights, which is easier than turning them off and back on again. We also have to create the shadowing skylight so that we get the smooth shading effect. After that, we can store the current render settings, and switch over to scanline. Finally, we render and then revert back to the old Renderer.
Step 4: Fill code.
macroScript Clay_Renderer
category:"Custom"
tooltip:"Take a clay render"
buttontext:"Clay Render"
(
	undo on
	(
		-- Create a white material and assign it to everything.
		WhiteMat = standard diffuse:(color 220 220 220) twosided:true
		for obj in objects do obj.material = WhiteMat

		-- Delete all the lights and create a skylight instead.
		for lux in lights do delete lux
		ThisSkylight = skylight castShadows:true rays_per_sample:12

		-- Store the current render settings, and set to scanline.

		-- Render

		-- Revert to the old renderer
	)
	-- Undo everything we did, leaving only the render.
)
So we’ve added the information regarding the material. In this case we’re creating a material called “WhiteMat” which is a standard material with a diffuse color of 220 grey and it’s two-sided. Why? Because if you think about it, a clay render doesn’t show off all the geometry if it can’t render backfacing polygons. Worse yet, even though backfacing polygons wouldn’t show up in the render, they’ll still affect the lighting solution which would create some unpleasant artifacts. It’s best to just set this parameter to true.
Next I’ve added in the code for deleting the lights and creating the skylight. What we’re basically saying in the first line is “For each light ‘lux’, delete it”. This can always be undone at the end of the script. In the next line, we create a new skylight called “ThisSkylight”, which is casting shadows at a rate of 12 rays per sample.
macroScript Clay_Renderer
category:"Custom"
tooltip:"Take a clay render"
buttontext:"Clay Render"
(
	undo on
	(
		-- Create a white material and assign it to everything.
		WhiteMat = standard diffuse:(color 220 220 220) twosided:true
		for obj in objects do obj.material = WhiteMat

		-- Delete all the lights and create a skylight instead.
		for lux in lights do delete lux
		ThisSkylight = skylight castShadows:true rays_per_sample:12

		-- Store the current render settings, and set to scanline.
		ExistingRenderSettings = renderers.production
		renderers.production = default_scanline_renderer()

		-- Render
		render()

		-- Revert to the old renderer
		renderers.production = ExistingRenderSettings
	)
	-- Undo everything we did, leaving only the render.
	max undo
)
Here we see the storage and changing of the renderer. We take this extra step because if you’re working on a scene in mental ray, but want a clay render, you shouldn’t have to go through the trouble of a) writing a totally different clay render script or b) storing your settings manually. We store the production renderer to a variable, and then set it to a fresh instance of the default scanline renderer. A fresh instance has all the default values, so we know there won’t be any kind of crazy settings getting in the way of the clay render.
Finally, we can take the render. Once that is complete, the script resets the production renderer back to what it should be, and undoes any weird changes (like deleted lights) that the script executed. We’re back to where we started except now we have an awesome clay render in the render window!
The best part of this is that now we have a button that we can place anywhere in the 3dsMax user interface that will create a clay render on command!
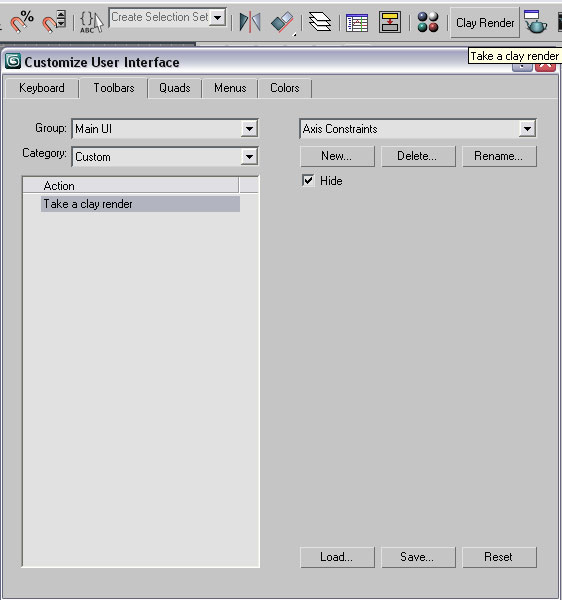
Hit the hotkey Ctrl+E to run the script so that it will appear as a macroscript. You can save the file to your <3dsMax Root>/UI/Macroscripts directory, and it’ll be loaded automatically every time you start 3d Studio Max. To add your new “Clay Render” button to the main toolbar, just click on the menu “Customize > Customize User Interface”. Go to the “Toolbars” tab, and from the category pulldown select “Custom”, and you’ll see your clay render button. Just drag and drop it from the “Action” window to the main toolbar, and the button will appear.
And there you have it! Now you can get a clean clay render no matter what your material, lighting, or rendering setup is!
Until next time, happy rendering!


By MrBluesummers.com » Blog Archive » Scripted Clay Rendering Tutorial December 4, 2008 - 6:16 pm
[…] Click here to read more! […]
By 3dsMax Tutorial Video MaxScript Introduction | MrBluesummers.com January 12, 2010 - 11:22 pm
[…] looking to get a little more practice with scripting, after the video you can follow my Scripted Clay Rendering […]
By stenionet April 3, 2010 - 7:21 pm
Now I can do something with MaxScript. Something very useful.
Thank you.
By mike August 20, 2010 - 5:08 pm
is this compatible with vray, and both for interior and exterior scene?