Ever seen a movie that had sparks flying out of control panels? Or maybe you’ve always wanted to have smoke coming out of your character’s ears when he’s mad? Those are particle effects, and you’ll find that they’re a breeze in 3dsMax when you use the right tools.
Particles are what artists use when they need a lot of objects, but don’t want to model or animate them by hand. Particle systems create, animate, and destroy objects according to a set of rules. These rules can be very basic, like “create 10 spheres per frame, starting at frame 0”. These are known as non-event-driven particle systems. 3dsMax particle systems can also be quite complex! Take, for example, the motion of soap bubbles in the air. They float quasi-randomly and if they touch, they stick together. If they touch another object, they’ll pop, and sometimes they just pop for no reason at all. This might be considered an event-driven particle system since the bubbles are subject to a variety of possible events.
We won’t be getting into the very gritty how-to details of particles during this tutorial. I’d like spend most of this guide walking you through the concepts involved in using basic particle emitters because 90% of the time they’ll do the job just fine. Toward the end of the tutorial I’ll introduce you to the particle flow and particle view tools that 3dsMax has to offer. This last segment will show you just how complicated your particles can be!
But don’t worry. At the end of the day, particles are meant to make your life easier, not harder. This walkthrough shouldn’t take more than about 30 minutes to complete, and when you’re done you’ll have a good exposure to the o
Non-Event-Driven Particle Systems
Let’s have a look at the simplest particle systems. I’ve gone ahead and created a simple scene to help illustrate the effects of my changes to the particle system. You can play with settings that correspond to what you’re learning about, or just skim the tutorial to get an idea of how particles work.
Spray and Super Spray
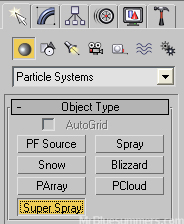
Spray and super spray are basically the same thing. Super spray includes all the functionality of the basic spray, so most of the time you’ll opt for this particle system. I’m going to dive into some examples of using super spray since it’s a great starting place for getting acquainted with 3dsMax particles. You can find the super-spray object under the create panel, under the objects category, and in the “Particle Systems” group.
Once you’ve selected the “Super Spray” object, you can click and drag on your screen to create a particle system. The size of the emitter will not determine how large the emitter is, but the position and orientation will determine the origin and direction of your new particle spray.
Now if you’re working from the default file, and still on time t=0, then you probably don’t see any particles at all. This is because particles are time based; they don’t happen instantly. Go ahead and scrub the time-slider at the bottom of your screen and you’ll see particles being emitted from your super spray object. You can also hit the “>” key a few times and you’ll step along the animation by a few keyframes.
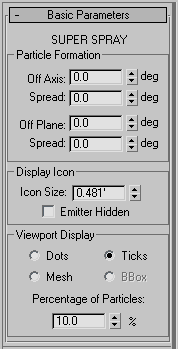
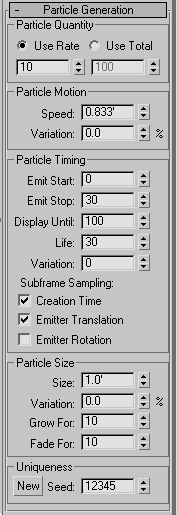
Let’s take a closer look at the super spray and it’s parameters. It may seem a little tedious since there are so many rollouts, but remember that a lot of the foundations we lay out here will help you when we’re looking at the other particle emitters and event-driven particle systems later on. I’ll try to keep things concise, but I’ve gone ahead and included the full rollouts on the left side. It shows every parameter in the super spray object.
Basic Parameters
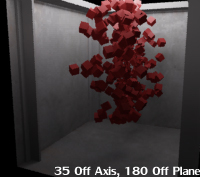
The basic parameters rollout will allow you to make changes to the direction that the particles flow, as well as how they’re displayed in the 3dsMax viewport. The off axis and spread parameters control how the particles are spread out over a single plane. Imagine a Japanese fan spreading out. It starts off as a single bar, and then fans out along a plane. Both of these “Off axis/plane” controls handle the rotation of the emitter, while the “Spread” controls handle the range over which the particles may be emitted.
The off plane and spread parameters, control how that 2-dimensional fan of particles is spread out over all 3 dimensions. If all four of these parameters is set to their maximal values, we’d expect to see a perfect circular particle emission. Such an effect would be useful for explosions or 360-degree emissions like meteors.
Finally, we have control over how the particles are displayed in the 3dsMax viewport. It’s generally recommended that you keep as few particles displayed as possible. 10% can sometimes be too high for particles like dust, clouds, and steam where you only need to see a very small fraction of the particles to understand their overall flow. Each particle that the computer has to draw is another drag on performance- even if they’re just ticks.
Particle Generation
Particle generation parameters are geared around how the particles behave and act during and after creation. Oddly, this includes parameters like speed, sizing, and timing, but not parameters like rotation and shape. Think this is wierd? Me too.
The first two parameters, “Use Rate” and “Use Total” cover the speed at which particles are generated. A rate is how many new particles should be created every frame, while a total is how many particles should be generated between when the emitter starts and when it stops. Thus 200 total over 50 frames (4 particles per frame) will generate fewer particles than a rate value of 5. This works in conjunction with particle timing, which controls aspects of the particles like how long they should be generated for, how long they should live, and the variability of that lifespan. I say this because you’ll often find that fewer, older, larger particles can often do the job of more, faster, smaller particles.
It’s sad, but particles die too. If they didn’t, your scene would be overrun with particles that drag performance into the ground. Remember to set a tight life for your particles to keep your render times down, and you’ll be fine. The variability aspect gives you some randomness for your particle emission, and works great for things like smoke and sparks.
Finally, particle size controls how big the particles are, how variable their sizing should be, and how they should grow and fade over time. If your particle’s life is set for 30 (that’s 30 frames) and they grow for 10 (frames) and fade for 10 (frames), then your particles are at maximum size for only 10 frames. If you set the grow and fade to only 2, then you have particles appearing almost instantly at full size and vanishing just as quickly.
As a brief note, the uniqueness parameter is for randomizing multiple emitters. For example, if you have 3 smoke stacks on a factory, you’ll want to set different seed values for each smoke stack to keep them looking different.
Particle Type
The particle type rollout handles parameters that affect the particle’s type and appearance.
There are three general particle types; Standard Particles, MetaParticles, and Instanced Geometry. The first is simply the creation of a massive number of primitive objects. Some of these standard particles are obvious like sphere and cube. “Facing” creates planes that face the camera on every frame, which works well for smoke and cartoon snow. The “Special” is two squares intersecting at 90 degrees, while the “SixPoint” is made of two rotated triangles to form a star. The constant is a facing square that is always the same size regardless of distance from the camera. The “Tetra” is a 3d pyramid shape made of four triangles. Notice that there are only three 3d shapes on this list; the rest are planar!
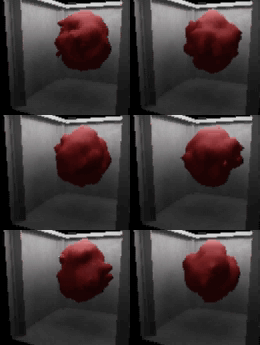
Metaparticles are similar to metaballs which are common across many 3d graphics programs. 3dsMax uses them to approximate fluid dynamics and other “goopy” effects. The special traits here are tension, variation, and evaluation. Tension controls how close the metaballs need to be to each other in order to deform and “goop” together. A low tension value means a high likelihood that particles will merge in flight. Variation controls the variance on this value, while evaluation handles the quality of the effect. A low evaluation coarseness means a very crisp result, while a high value means a very rough result.
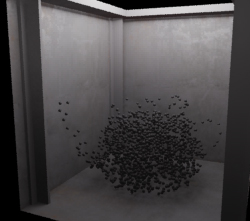
The “One Connected Blob” parameter is a lot of fun. It culls stray particles from the render and keeps only the largest connected blob of the particle emitter. Useful for an “oh no; it’s growing!” type effect (seen here).
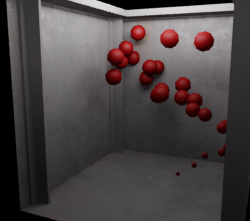
Finally, the instanced geometry object type is relatively self-explanatory. It allows the emitter to blow out copies of an object you’ve already created. This works well for leaves, tennis balls, lawn mowers, or whatever else you can think of. Nothing’s more fun than raining televisions through your 3dsMax scene.
You’re able to control the sub-animation of the object (for example if those lawn mowers are engaged) as well as the material source. You can chose to obtain the instanced geometry’s material from the icon (i.e. you can apply a material to the emitter itself) or from the original geometry source.
Rotation and Collision
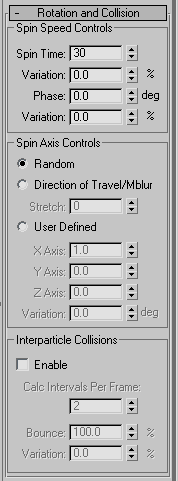
This next rollout handles how 3dmax handles the rotation of the particles, as well as the inter-particle collisions.
The particle rotation is more important for some particles than for others. For example bubbles and water won’t create any visible effects from rotation. On the other hand, cartoon-y snow flakes rely on the effect quite heavily. The spin time parameter determines how many key frames there are during a full 360-degree rotation of the particle. A high value here will slow down the particle rotation considerably, but a value of zero will provide no rotation at all!
The “phase offset” controls the initial offset for the particle rotation. Don’t worry, the varying particle ages (and variation on spin time) will keep your particles from rotating all together.
The spin axis control handles the base rotation for the objects. Some 3d objects will rotate over a predefined axis- like tires. Others have no particular rotation like our tennis ball example earlier. Thus, you may choose between a random spin axis (full 3d spin), direction of travel spin (holding the directional vector spin-less), or arbitrary spin directions (set your own spin levels). The direction of travel spin is probably the hardest to describe or understand. Imagine a propeller of an aircraft moving forward through space. It’s rotating over one degree (spinning) but not the other two (tumbling and twisting).
Inter-particle collisions is a massively intensive process that checks for particles striking and bouncing off one another. This is useful for small numbers of detailed particles like throwing televisions or bouncing tennis balls around. However, do not turn this feature on unless you’re looking for “broadcast quality” effects because it will slow down your render times considerably. Calculation intervals per frame control how often 3dsMax checks for inter-particle collisions, while the bounce coefficient and variation control how much speed the particles should retain when they bounce off of each other. I can’t stress this enough, do not turn this on unless it’s really necessary!
Object Motion Inheritance and Bubble Motion
These two rollouts are pretty straightforward.
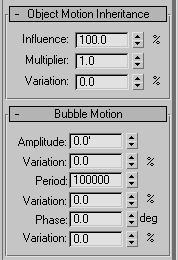
The first controls how the particles should inherit the emitter’s motion and keyframing. While this might sound silly, think about how your emitter might be moving. That new space-ship might look extra cool if it’s gravi-pads could shoot out sparks during flight! Or maybe it’s taking damage and throwing gibs that need to fall away during the great escape sequence. Thus, you need to allow the particles to take on some or all of the motion of the parent emitter in order for the particles (especially heavy ones) to be emitted properly.
Bubble motion is what bubbles exhibit as they move upward through water. They wiggle randomly during motion. Similarly, you’re able to append an amplitude (severity of the effect), period (the amount of time to complete a single “wobble”, and phase (synchronicity across emitters).
Particle Spawn and Presets
Finally, we have particle spawn and presets. I’m not going to go into a lot of detail on these last two rollouts, as they’re not really suitable for this walkthrough.
The super spray presets are pretty self-explanatory. This rollout contains a number of pre-built emitter settings and it provides you the ability to create your own.
The particle spawn group controls “advanced” particle spawning procedures such as what kind of spawning procedure should take place when particles collide, die, or continue. To die on collision will destroy the particles that’ve struck a deflector (more on this later). By this point, you should be able to deduce what “spawn on collision” and “spawn on death” imply. Show trails will create new particles every keyframe, which can be useful for certain effects such as fireworks or sparks.
The directional chaos, speed chaos, and scale chaos groups have to do with the spawning of new particles (spawn on collision, spawn on death, and spawn trails).
Note that these high-end settings allow you to create fantastic effects such as fire, complex explosions, and more. By spawning many smaller particles from a larger one, you can simulate how an object might burn or subdivide while animated. Directional chaos controls the variance in the sub-particle’s direction. Speed operates in much the same way. Scale chaos handles the sizing of the sub-particles.
Other Particle Emitters
Alright! So we’ve had a long hard look at the super spray particle system in 3dsMax. But what about the other emitters? Lucky for us, particles have a finite span of concepts, and we’ve already covered 95% of them! The remaining particle systems like snow and pCloud are just different combinations of the same idea.
Snow
Snow is an optimized particle generator geared toward creating snow or confetti. What separates snow from spray is that the snow particle emitter can generate particles over an area rather than from a single point like the spray. There aren’t many parameters to this emitter- only the basics. Emission speed, timing, particle type (six point, triangle, or facing), particle size, and rotation. That’s it.
Blizzard
Blizzard is to snow as super spray is to spray. The 3dsMax blizzard particle emitter is basically a snow emitter but with much greater control. You have access to very similar controls as the super spray emitter like object motion inheritance, collision control, and presets. 3dsMax blizzard particle emitters still retain their most important characteristic; area particle generation.
pArray
Ah the particle array! This fantastic mechanism allows you to spread particles over the surface of an object rather than simply flying through the air. This is a very different concept than the other particle emitters, so I’d like to spend a little more time discussing it’s importance and uses.
The particle array can be used for a variety of tasks. For example, you could spread water droplets over a product, or rocks and trees throughout a meadow. The pArray emitter is often used for populating a plant with twigs and leaves to create a tree or shrub. This geometry based distribution is a very powerful tool. The best part is, you’re already familiar with most of the parameters that pArray uses like collision handling and particle object types.
pCloud
The 3dsMax particle cloud is another powerful tool. Similar to the particle array, the cloud allows you to fill an object’s volume with particles! This could mean anything from schools of fish to a ring of asteroids filling a massive torus. You can use this emitter to create a wide variety of effects. The only distinguishing feature of this emitter (and it’s parameters) is that you must select a bounding volume (cube, sphere, cylinder, or an object you created). You can see this emitter in action on the right, where I’ve filled a teapot with spheres.
Remember that pClouds and pArrays can be used to great effect in your 3d modeling as well as your animations. For both single images and animations, these two tools are quite valuable for adding detail beyond what you can do by hand.
Forces and Deflectors
What good are particles if they can’t be controlled? That’s why we have forces and deflectors available to us. Deflectors are typically quasi-objects that help keep particles from doing unusual things like going through walls or characters. If we wanted, it’s possible to make particles use the object mesh for collision detection every time. But the better route is to approximate the shape using cubes, spheres, and planes whenever we can. Forces are useful for directing the flow of particles so that we don’t have to keyframe them by hand to create complicated effects like tornados, explosions, and wind.
Let’s run through some of the simpler forces and deflectors and see how they can be useful when working with 3dsMax particles.
How and Where
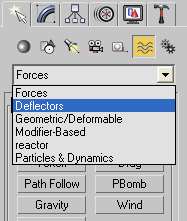
You can find forces and deflectors under the pulldown in the create panel under the space warps group. Each of these objects can be created in the same way as ordinary spheres and cubes; by clicking and dragging. However, in order to have them affect a 3dsMax particle emitter, forces and deflectors must be “bound”. You’ll find the “bind spacewarp” tool in your main toolbar along the top of the screen.
You use it by starting with the spacewarp selected and click-dragging to the emitter. This will bind them together, and you’ll see the effect in two ways. First, the modifier stack of the emitter will have a “Binding” modifier showing you that it was effective. You should also see some effect on the particles in real time.
Deflectors
Deflectors are ways of controlling particle flow by preventing them from penetrating geometry that’s supposed to be solid. But why not have an option to prevent penetration of any polygons? Because the process can become processor intensive very, very quickly. While I’m not saying you need to use deflectors sparingly, you should give 3dsMax the luxury of some approximation. If your space-ship is a flying saucer, just approximate it with a squashed sphere.
That said, let’s have a look at the various deflector types! Imagine deflectors as a combination of 2 factors; shape and functionality.
Shapes
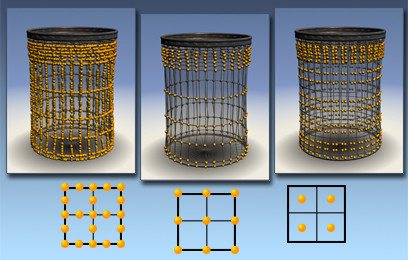
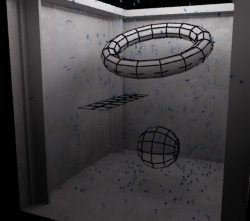
There are three shapes in the deflector selection; spherical, planar, and universal. The first two are self-explanatory; they’re shaped as the name suggests. The universal deflectors are based on geometry that you specify. This means you can have that battle cruiser pushing asteroids out of the way perfectly. However, remember that this could tax your system heavily, so it’s a good idea to create a low-polygon mesh that can act as a proxy for the real 3d model.
In the image on the left, I show you how each of these shapes act. I’ve created mesh objects to represent the 3 deflectors in the render. The torus object is an approximated version using much fewer polygons than the rendered object has.
Functionality
Next, there are three functional flavors of deflectors; ordinary, dyna-flect, and omni-flect. The first type of deflector is a highly simplified version of the deflector idea. Think of these as similar to our spray versus super spray concept described earlier. The next, dyna-flect, is for use with reactor objects and other reactive bodies. You’d use it when you need the target object to respond to being struck by particles (like tank armor deflecting bullets but getting dented).
Very briefly, what makes omni-flect deflectors special compared to ordinary deflectors, is that they provide many additional features. Allow me to summarize them here:
- Reflection parameters – the ability to tweak how “bouncy” particles are as they strike the deflector.
- Refraction parameters – for particles that penetrate the deflector, you can chose to have some of them follow a “tweaked” bearing. Note that reflection is calculated before refraction, so if you wanted half of the particles reflected and then the other half refracted you’ll need to set 50% reflection and 100% refraction.
- Friction parameters – for glancing angles and particles that’ve come to rest on the deflector, the friction parameter helps them slow to a stop. This is useful for large numbers of objects subject to gravity.
- Spawn reactivity – for particles that have options controlling how they spawn on collision, these parameters let you tweak that for each deflector. For example, if your sparks strike concrete, they’ll break apart and spawn more sparks, whereas if they hit the welder’s clothing, they could just stick and then die in a few frames.
Forces
Forces allow you to direct the flow of 3dsMax particles without having to bounce them around with deflectors. Think of forces as the “go here” command to the deflector’s “don’t go there” command. You can combine forces to create very specific and complicated effects like galaxies, tornadoes, and harsh weather effects.
You create and bind these forces in the same way that you would for a deflector. Just select the object, click-drag to create it in your scene, and then use the “Bind Spacewarp” tool to link it into your particle system. Let’s take a look at each type of particle emitter in 3dsMax. To aid in visualization, I’ve included some of the images from the help document. I’m sorry I can’t include them all; there are a lot of space warps in 3dsMax!
- Push – Exactly as it sounds; this force will consistently push particles in a single direction. This force is acceleration, so the older a particle is, the faster it’ll move!
- Motor – Operates similarly to the push force, but it applies a rotation at the same time. Remember spin art? It’s a lot like that. Because the “Motor” icon rotates your particles around it’s axis, the orientation is important!
- Vortex – Operates essentially like a push and a motor at the same time. It applies a “swirling” motion in order to form a funnel similar to a tornado, black hole, or water spout.
- Drag – Lowers the speed of particles as they age. You know how bullets slow down quickly as they enter water? And that’s why action heroes always jump off the boat in order to get away from the bad guys? That’s the effect that the drag force creates.
- Pbomb – Provides a shockwave that blows particles apart. Very simple to implement because it is essentially only timing and intensity parameters.
- Path Follow – Forces particles to follow a spline as they move. The key to remember here is that you can either have the particles follow the path as they exit the emitter, or follow the path as they come near a certain area.
- Gravity – Operates exactly as it sounds. Gravity exerts a constant, uniform pull on all particles in a given direction. You can also exert spherical gravity, which is very fun for modeling little galaxies and watching them congeal!
- Wind – Wind is a lot like gravity in that it applies an omnipresent, uniform force from a direction. However, wind has many more options for simulating turbulence and non-uniformity over time. In conjunction with snow or blizzard particle generators, you can make some very convincing weather effects.
- Displace – A very fun space warp. The displace operation will deform both particle systems and geometry! This is a big deal because it helps you bridge the divide between special, custom objects (like your character) and particles (like rain).
So far we’ve only looked at particle emitters, space warps, and deflectors.
3dsMax particle emitters will generate particles according to predetermined criteria. While they vary from emitter to emitter, the fact is that they’re static implementations of a more diverse idea. The space warps and deflectors have the capacity to alter the behavior of the particles, but not really their look and feel.
That’s why we have access to a powerful tool called Particle Flow. It allows us to customize the rules and procedures that govern the timing, motion, and look of particles.
Particle Flow
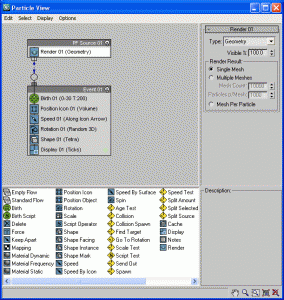
Next to the Snow, Blizzard, and super spray particle emitters in the 3dsMax interface, you probably noticed that there’s one I didn’t mention; “PF Source”. It’s full title is read as “particle flow source”, and it acts as the main conduit for creating very extensible particle systems. Go ahead and create one in your scene, and, under the modify panel, click the “Particle View” button from the “Setup” group.
I realize that this window is terrifying. Autodesk does not do well in creating a clean and easy interface. However, their engineers are a credit to the industry, so once you get past the cold interaction you’re on top of the heap.
Understanding the terminology of the window will help you understand what each of the 4 quadrants are. The particle flow diagram is made up of events that contain “actions”. In the upper-left quadrant of the window, the default events contain actions like “Birth”, “Position”, and “Speed”. These actions contain parameters similar to the ones you saw in snow and super spray earlier. These parameters are displayed in the upper-right quadrant of the window when you’ve selected an action in the particle flow view.
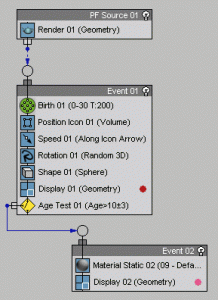
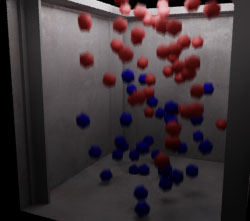
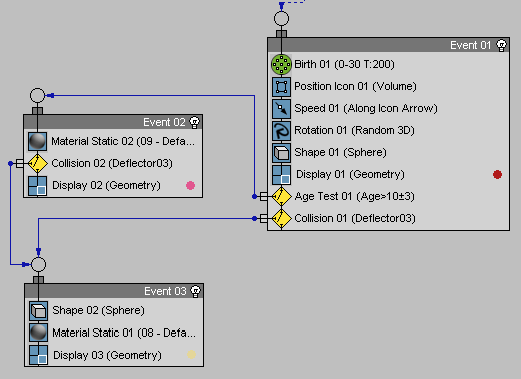
The lower right quadrant is called the “depot” and it provides access to all of the possible actions in particle flow. You can drag and drop these actions into the events in the particle flow diagram in order to affect your particles. For example, if we wanted to change the particle material after 30 frames, we’d use an age test, followed by a “Material Static” action. This effect is shown on the right. The resultant particle flow diagram is shown on the left. Finally, the lower-right quadrant shows you a quick description when you select an action from the depot. It’s useful for understanding if the action you’ve selected will actually do what you want it to.
Whew! That’s a lot to take in, huh? Take your time and don’t get overwhelmed! This will feel like second nature to you in one or two projects. Even better, you’ll be adding a skill to your toolset that will make you a much more valuable artist.
Above you saw how I created a custom event that would have never been possible with ordinary particle understanding. In this way, I can create a wide variety of complicated effects for both still renders and animations. Let’s try making one more complex interaction, and then we’ll call it a day.
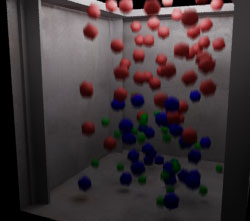
I’m going to create a deflector in my particle flow that’s going to bounce the balls off of the floor. When the balls bounce, I want them to turn green, and get smaller. I’ll do this by creating a “Collision Test” at the very end of “Event 01” which will ensure that the collision test takes place after the age test. This way balls that bounce will be green regardless of their age, but blue balls can bounce and turn green. In the upper-right quadrant, when I select the collision test I created, I can set the floor deflector as part of the particle flow system. Once the planar deflector is in place, I can simply drag a “Material Static” and “Shape” actions into the particle flow diagram, and link the event into the flow diagram. It’s important to note that I need to link the age test into the final collision event, or I’ll end up with blue spheres falling through the floor and green sphere’s bouncing back up!
Key Takeaways
- Particles save you time – The fact is that you shouldn’t have to model large numbers of objects very often, and even reactor can only go so far. You’d be surprised how applicable particles are in working with 3dsMax. Any effects that need a large number of objects can be replicated using the standard particle tools available in the program.
- Deflectors are for control – Use deflectors to control your particles. Think of them as the banisters on the side of the freeway. Your particles need to know where they aren’t allowed to go. This means anything from preventing penetration of walls and characters, to handling complex interactions like a car plowing through gunfire.
- Forces are for flow – Use forces to direct your particles. This is different from deflectors because you’re providing the impetus for your particles do what they were intended to do. Think of forces as the freeway itself- it tells your particles where they’re expected to go.
- Particle Flow is amazing – Particle flow is, indeed, amazing. It gives you the ultimate level of control over particles in 3dsMax. You can set up infinitely complex rules that govern how your particles look, where your particles go, and how they’re presented when rendered. You can link age to material like we did in the example above, but don’t let that limit your imagination! Make particle flow rate variable over time, or try making your particles glow using mental ray materials! The sky’s the limit.
I hope you’ve enjoyed this particles walkthrough. If you have any questions or comments, feel free to leave them on this post, or e-mail me at MrBluesummers@MrBluesummers.com As always, take care. Happy modeling.




By Jon December 4, 2012 - 10:57 pm
Thank you so much for defining all of these parameters! You don’t know how long I’ve been wandering what all of them do in their own facet! Brilliant breakdown of particle systems!
By 3Ds Max Notes. | genesis375 April 14, 2013 - 9:29 am
[…] Particle – In 3D are used to create, animate, and destroy objects according to a set of rules. These rules can be very basic, like “create 10 spheres per frame, starting at frame 0″. (Source here.) […]