I know this is old, but it’s still a great demo. I’ll keep my ear to the ground for any other developments.
nVidia: Mobile 3d Handled Server-Side?
Hey all,
I’ll have this week’s Monday Movie up shortly. I just wanted to make a quick post with this link. Turns out nVidia’s RealityServer is slated to handle the 3d rendering server-side and then pipe the result to devices that lack the power to do it locally like mobile devices or netbooks.
This has huge implications for mobile and web-based gaming. Take a look at the whole article here.
RealityServer is Nvidia’s attempt to bring 3D to any computing platform that supports a browser or standard Web services calls, including netbooks and smartphones.
By moving the CPU-crushing rendering requirements of creating high-resolution images and animations off of the client and onto a back-end computer, Nvidia hopes to bring complex graphics applications like fluid dynamics, architectural design, real-time product styling and design, 3D video games, to computing platforms that don’t have the processing power to run them locally.
3dsMax mental ray Water Surface Tutorial
This technique is a favorite of mine for its simplicity and effectiveness at creating a convincing water surface. Remember, though, that you won’t be able to see below the surface because the material setup in 3dsMax is opaque. At least it’s fast to render!
This tutorial will guide you to achieving a fairly realistic open water effect which can even be animated, using the ‘Ocean’ shader from the Lume Library.
3dsMax Tire Modeling Tutorial
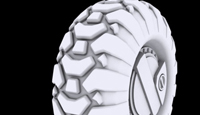
This is one of the more interesting tire tutorials I’ve found. While it’s not the easiest or the clearest, I really liked the outcome and unusual application of the FFD modifier. I’d call this an intermediate/advanced tutorial so if you’re still a little hazy on certain aspects of modeling you might shy away from this one.
You can start the treading from box modelling or splines. I personally use splines for 90% of my work, but if using splines then you will need to tidy up the model to clean up the geometry…
Video Tutorial – Circular Mesh Holes
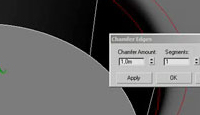
I know I’ve already covered this topic to the point of making you physically sick, but Luciano Iurino does a fine job describing the technique as well. In this video tutorial, he talks about how to create circular holes in a 3d mesh using a few different techniques. As always, 3dsMax gives you 10 ways to do just about anything!
This tutorial shows how a perfectly circular hole can be cut into a mesh using the Editable Poly tools alone. It demonstrates a quick, clean and effective way of creating holes that avoids the often messy results caused by Boolean operations.
Dielectrics and Glass (Physics_Phen)
This is a detailed dive into some basics of Glass material and the Dielectric shader in mental ray. Worth a look when you’re in the mood for a lecture.
For readers “too used” to using raytrace glass this tutorial will seem quite alien in the beginning, and the methodology of modeling the objects utilizing these two materials will definitely appear even more alien. Both the Dielectric Material Shader and the Glass (Physics_Phen) are closely related to each other, though technically the glass ((physics_phen) also known as mental ray glass) is not a shader.
Modeling Low-Poly 3d Foliage
This was one of my favorite tutorials that I’d give to students learning how to model. It’s a fairly basic plant modeling tutorial that goes into detail for both Photoshop and 3dsMax. You can really get a lot of mileage out of this workflow because it can be used to create a wide variety of plants.
We are going to create this orchid thingy. So take a good look at it, because we need to store its form and colors into our brain. Now start a new photoshop image and add a green background. You should always choose the dominant colour as your background color…
Beginner’s 3d Modeling Tutorial
I found my old toaster tutorial on 3dTotal and figured I’d give it a link. It’s a very slow paced beginner’s modeling tutorial. Great for people just starting out with 3d Studio Max.
I actually remember when I was starting out with 3DSMax and I realized there aren’t enough tutorials out there that really walk you through every click, movement, and heartbeat of production. That’s why I decided to model a toaster and document every process along the way. With any luck, if you follow this tutorial, you should end up with something that looks like my toaster here.
P.S. I’ll be going through various 3d tutorial libraries I know and cataloging the good ones here. It’s a good thing to do because a) people don’t find the good tutorials if I don’t post them, and b) I’ve always wanted a place that I can go to find my favorite tutorials. I figured maybe you’d appreciate it too. 🙂
100 Free Rusty Metal Textures
Those guys at 3DTotal have done it again! They’ve uploaded 100 free rusty metal textures to their library for you to enjoy. Make no mistake, they’re not seamless or massive like their for-sale libraries (which are also exquisite) but it’s hard to rag on something that’s free. Head over and add a bookmark!
3d Details Through Texturing
Hey all,
Don’t know if you saw this, but 3DTotal just uploaded a great new tutorial/walkthrough on creating 3d details through creative texturing. I liked it because it really focuses on enhancing your details through texturing. For those of you in the low-poly space, this is especially important to think about.
Enjoy!
Turbosquid Signs an Autodesk Deal
At first glance, I nearly fainted because I thought this was yet another Autodesk merger deal that I’d have to write my congressman about. To my surprise (and dare I say relief) it is not. I’ve got a few thoughts on the matter, but I’ve been told that brevity is not my strong suit so I’ll try to get my point across quickly.
Good things
There are a lot of good things to be had here. According to Matt Wisdom’s blog post that’s going to mean as much as a 20x increase in their targetable audience. Now I balk at these quotes because they tend to be blown way out of proportion. But if you actually browse Autodesk’s Seek you’ll find that the aggregate content offering is unexpectedly thin, and what’s there isn’t up to the level of quality I’ve become accustomed to on Turbosquid. When you blend this thirst for quality content with even the more modest estimates of traffic growth, you get a smoothie that’s quite digestible for the Turbosquid content creator.
From a strategic standpoint, Matt’s also right in that Revit and other advances are forcing CAD users to meet a higher bar of visual quality, and Turbosquid needs to be on the forefront of that. Merging these two platforms to help prepare for that trend looks like a good strategic move.
What Does it Mean
For you and me? Right now? Not a whole lot. These kinds of things take time to ramp up, and Autodesk is nothing if not a lumbering behemoth of a company. I’m afraid I can’t put a timeframe on this for you, but it’d be a good idea to start shoring up your inventory now to make sure you’re in a good place when visitors come looking for refrigerators, hot carts, and couches.
In the long run, I generally see good forces coming together here. Your products will get exposed to more traffic and more traffic almost always means more sales.
Things to Watch Out For
This deal does have a few things I think we’ll want to watch out for.
First, the content that Autodesk Seek provides and the content that Turbosquid provides are different in that the Seek merchandise is real. You can find an American Standard toilet in Seek and know that there’s a real manufacturer behind it, and that the model is made to the specifications of the real thing. I’ve found that Turbosquid’s content base is skewed toward things that look good, but aren’t exactly made from the manufacturer’s blueprints. The items that are to specification cost more because they’re usually quite good.
Targeting Seek’s CAD audience looks like it’s going to require a different tactic on our part as content creators. It’s going to emphasize more careful work. While this doesn’t mean modeling like a surgeon, it does mean you’ll have to try adding precision to your speed/quality mixture. I’m half-expecting a validation service like “Game-Ready Submission” except geared toward architectural visualization. Judging by the visual appeal of Seek’s inventory, I’m confident that most of you out there can rock this party, regardless. And don’t forget that corporate players have deeper pockets- don’t feel bad charging more money for that model.
Second, I’m always wary of Autodesk getting fresh with companies I like. They’re like a claims adjuster- they might seem nice but in reality they have an agenda that might not be in your best interest. The cynic in me says this looks a lot like Autodesk trying to reinforce a humdrum product with Turbosquid, and the latter being oblivious and happy to stand in the shadow of such a large corporation. But I don’t often listen to the cynic in me- he’s depressing. Turbosquid isn’t staffed by idiots or they wouldn’t have made it this far. I’m sure they’re keeping this deal at arm’s length, and both companies will walk away better for the cooperation.
So that’s the rundown from my perspective. As always, we’ll see what happens.
Importing Pre-Painted Textures into Mudbox
Hey everyone,

Importing Pre-Painted Textures into Mudbox
I know I don’t hit Mudbox users enough, so I’ll try to start posting good stuff I find around the internet. For starters, 3dTotal posted an interesting little trick for Importing Pre-Painted Multi-UV Textures in Mudbox. It’s very quick- about 3 minutes long. Word on the street is that a Mel script will eventually be available from Autodesk for bringing multi UV textures back into Maya.
Introduction to 3dsMax ProBooleans

3dsMax Boolean Types
Booleans have been in 3dsMax as far back as most of us can remember. It’s a powerful object type that allows you to combine objects together using a Boolean operation. You can combine two together to form a new, unified mesh, or subtract them from eachother and create shapes that would otherwise take a very long time to create. If you’re coming from Bryce or Vue you’ll find that Booleans are a delightful (but slightly bitter) taste of home. ProBooleans clean up and add to the ordinary Boolean object in many ways that we’ll outline shortly. It actually makes it the indispensable 3dsMax tool it was meant to be.
In this primer paper, I’ll be walking you through the ProBoolean compound object in 3dsMax. We’ll first do a deep dive into the features available in this tool, followed by when you should use Booleans and some techniques for doing so.
ProBoolean in 3dsMax
ProBooleans in 3dsMax are a glorious thing. Back in 2004 I was quoted as saying (with some exaggeration) that “I could die happy if ProBooleans was bundled with (the next shipment of) 3dsMax.” To some extent this was true. I learned on Bryce, so having a solid Boolean foundation starting out would’ve made my transition much easier. Let’s take a scenic drive through each of the aspects of this tool, and I’ll try not to get too gushy.
Pick Boolean Rollout

3dsMax Boolean Types
The 3dsMax Boolean operand instancing types are identical to the ones in the original boolean object. You can choose how your object is brought into the boolean hierarchy, and this can give you tremendous leverage over the final object.
Reference – The operand is instanced into the hierarchy, but modifications can only be made to the original object (the one not in the ProBoolean object).
Copy- The operand is duplicated and brought into the hierarchywithout any instancing.
Move- The operand is put directly into the heirarchy, and it exists only in the Boolean object.
Instance– The operand is instanced and moved into the Booleanhierarchy. Modifications can be made to the original or to the instance in the Boolean object.
ProBoolean Parameters Rollout
The parameters rollout is where you’ll find the meat and potatoes of ProBooleans in 3dsMax. From top to bottom, it contains 5 sections- Operation, Display, Apply Material, Sub-object Operations, and the Heirarchy viewer.
Operation
This group handles what Boolean operation to execute on the objects. Remember that this is the operation you want the selected object to execute. I.E. “I want this object that I picked to be a subtraction from the object that I have currently selected.” You’ll find the rundown below:
- Union- Combines the objects together into a single mesh. The volume is combined as well.
- Intersection- Creates an object in the area where all objects share some volume.
- Subtraction- Removes the volume defined by the operand from the parent.
- Merge- Attaches the objects together (similar to Editable Poly’s “Attach”), but cuts the objects where faces intersect.
- Cookie- Conducts the requested operation (Union, Intersection, Subtraction, or Merge) but removes faces created by the operand.
- Imprint- Overrides the selected operation and simply cuts the parent object where the operand intersected it.
Display
This group is pretty self-explanatory. It determines whether you’d like to see the result of the Boolean operations, or the 3dsMax objects that make up that result.
Apply Material
This group handles how you’d like materials to be handled during the boolean operation. “Apply Operand Material” will apply the incoming object’s material to the faces it creates. Click on the image on the left to expand it. If we had set this operation to “Retain Original Material”, the entire box would still be grey.
Sub-object Operations

3dsMax ProBoolean Parameters
This is where things get interesting. Suppose you’ve inserted an object into the ProBoolean heirarchy and suddenly you need it back or need to delete it. “Sub-object Operations” is where you’ll find that kind of functionality. The “Extract Selected” button will do just that- extract the selected object in the Heirarchy Viewer according to the extraction method you’ve chosen. You have 3 extraction methods to choose from:
- Remove- This will extract the object from the heirarchy and leave you with the original object.
- Copy- This will create a copy of the object that you may manipulate independent of the original in the ProBoolean heirarchy.
- Inst- This is short for “Instance” and will create an instance of the object that you may manipulate in order to impact the Boolean object.
Besides this you’ll see “Reorder Ops” which will change the position of the selected object to whatever the number is in the spinner. By default it’s set to one, which will move the selected object to the top of the chain- just after the base object. Finally, the “Change Operation” button will change the net operation of the selected object to whatever is selected in the “Operation” group.
Advanced Parameters Rollout
Update
This group will control how the Boolean object is updated. If you’ve got a chain of operations that contains extremely complicated operands, you’ll probably want to keep the updating to a minimum to keep things snappy. While the default is set to “Always” you could set your updating mode to accommodate more complex situations.
Decimation
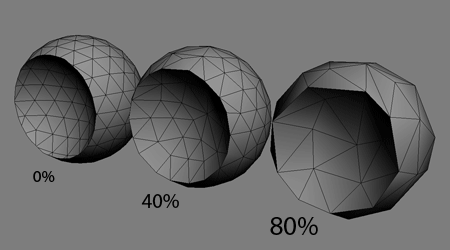
Decimation controls the optimization that 3dsMax does after the ProBoolean operations are complete. You can think of it as a cleaner, smarter “Optimize” modifier that comes with the package. The percentage value represents the percentage of edges that are removed from the final object. The higher this value, the more optimized the mesh becomes.
Quadrilateral Tessellation
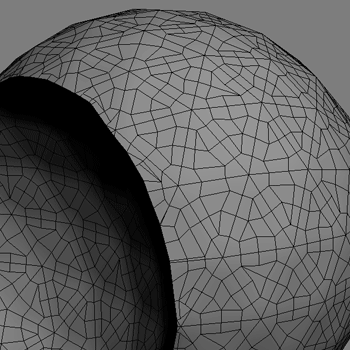
When enabled, this feature will convert the final object into an all-quads 3d mesh. This is an excellent feature if you’re looking to meshsmooth the final result. While the final polycount will be quite high, this can be very useful for certain situations.
Planar Edge Removal
Having control over how ProBoolean deals with geometrically meaningless edges can be quite important. You’ll find this most useful when you’re combining objects that have coplanar, adjacent faces that have different materials. Sometimes ProBoolean will ignore the different materials and remove faces anyway, and this can cause problems. Know that you can control this change from the “Planar Edge Removal” group.
When and How to use Booleans in 3dsMax
I recently created a Monday Movie showing you how to use the ProBoolean compound object to create meshsmoothed text in 3dsMax. That’s just one example of what you can do with this feature.
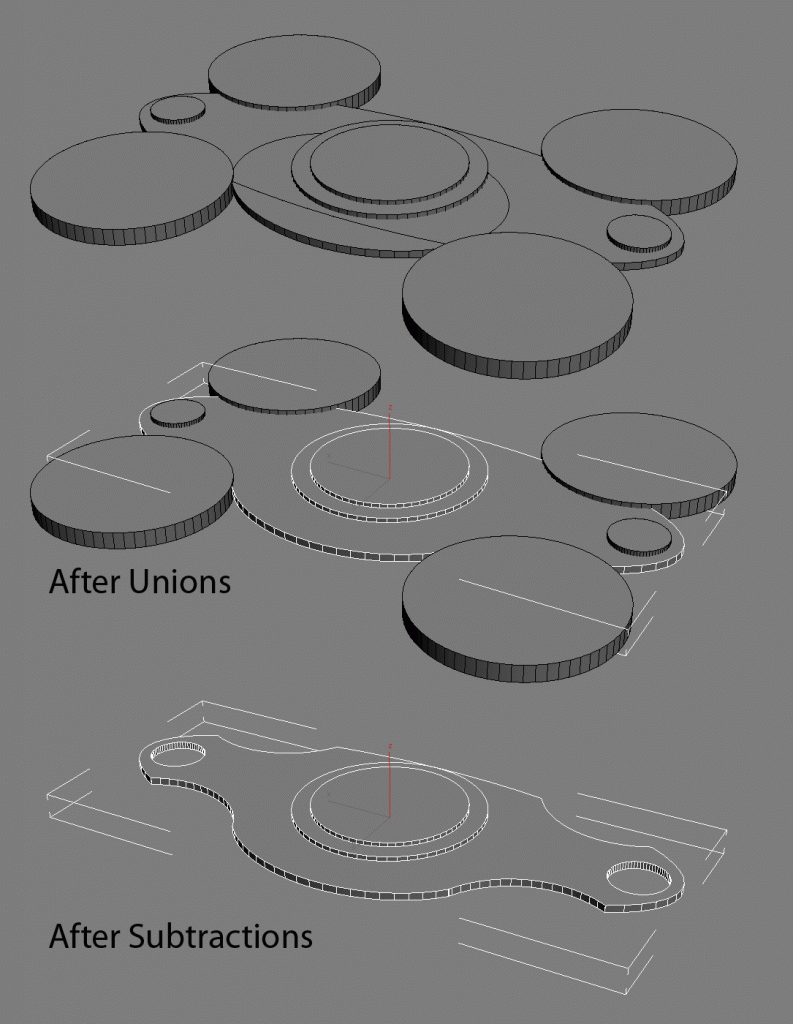
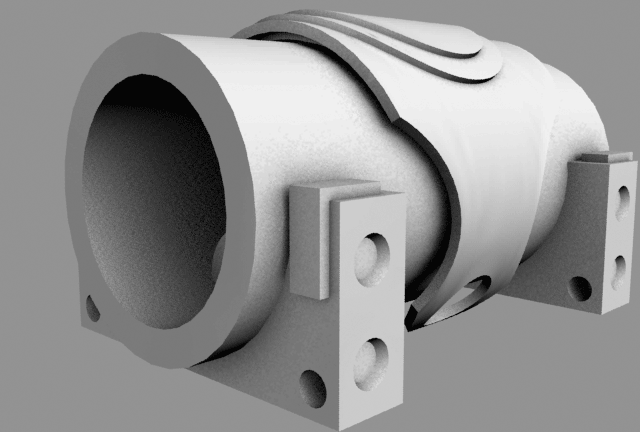
I’ve found ProBooleans to be most useful for creating custom parts for mechanical renderings. With the quadrilateral tessellation, you can take this a step further in order to meshsmooth the result. Take a look at the images below that show a basic object being built using ProBooleans. Something of this complexity might take significantly longer to produce using polymodeling. ProBooleans allow you to virtually ignore mesh structure in favor of form. It allows you to say “I don’t care what the mesh structure looks like, I just want an object that looks like this.” While this tends to yield relatively polygon-intensive objects, it can be a big timesaver.
Take a look at the workflow below. If you’re feeling adventurous, try doing what I did but then applying the quadrilateral tessellation and a bend modifier.
You can really go pretty crazy with ProBooleans as soon as you get a feel for what’s possible. If you go easy on the tessellation, you can get some great effects at relatively little incremental polygons over modeling it by hand.
Until recently, the only advantage ordinary Booleans had over ProBooleans in 3dsMax was that they were exposed to MaxScript. However, even now this has been met with the exposure of ProBoolean to the scripting language. As far as I know, Booleans remain in the 3d Studio Max package for legacy support reasons.
Common Errors
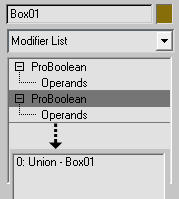 The single most common error with 3dsMax ProBooleans is “Invalid Boolean” or “Check Operands for Self Intersection”. This is commonly caused by having a ProBoolean object wrapping another ProBoolean object where the child object made no changes. It’s caused by clicking ProBoolean twice on an object and then trying to select operands. You can fix it by extracting the original object, and creating just one “ProBoolean” layer.
This happens all the time, don’t sweat it too much.
Another common issue is that ProBooleans crashes 3dsMax for extremely complex or taxing objects. You’ll just add an operand, and 3dsMax will stall and stop responding. This, too, happens all the time. Booleans are a tricky object type and they are naturally rather resource intensive. Remember to give the program plenty of room to breathe, and if it starts acting sluggish or stops responding, don’t click around wildly. 70% of the time, the program will finish what it’s doing in about 10 seconds and recover from the crash. Remember that nothing beats saving often. I have Ctrl+Alt+S wired to “save-incremental”. Every project of mine easily has dozens of incremental scene files.
If you find that your computer is struggling to keep up with a ProBoolean object in your scene, you can always apply an “edit mesh” modifier to help keep things snappy.
Another common problem is subtraction artifacts, though these are much less frequent in ProBooleans than in ordinary Boolean objects. Even then artifacts don’t often come up in Max 2009 or higher. When they do happen, they tend to occur when 3dsMax mistakenly inserts additional vertices along the edges in a subtraction. While ordinarly this shouldn’t cause any problems if you’re not worrying about meshflow, they can cause problems in the polygon normals causing a strange tearing effect. However, if this is still important, or if you’re getting artifacts on planar surfaces, you might want to read Bracer’s Vertex Cleanup Tutorial.
And there you have it. In this paper we’ve laid down a foundation for using ProBooleans in 3dsMax. Now go play around with the toolset and start crashing the program. If you’re not crashing 3dsMax at least once per week, it means you aren’t trying enough new things!
Hosting Issues
Hey all,
Wanted to let you know that my webhost (IXWebhosting) is having some trouble keeping my site up. I’m going to give them a very stern talking to, and I’m considering migrating the site to somewhere with a better up time.
Again, sorry for the dodgy serving.

