Vault Commercials

Written February 17th, 2009
Categories: Blog
1 Comment »

Long story short, I’m still working on that new website I told you about, and I haven’t had much time for new tutorials. While it won’t get in the way of my most important commitment– the Monday Movies, it is delaying most other things. I’ll have more 3dsMax tutorials for you soon, I promise!

In order to placate your thirst for fresh content, I’ve dredged up my favorite beverage commercials from a few years ago.  I’m not sure if Coca-Cola still makes Vault, but I remember it being a very delicious drink.  It was a little sweeter than 7-up’s dn-L soda (get it?) and had a little more caffeine than Mountain Dew.  It also had funny commercials where the announcer was basically inspiring these boring men to do extraordinary things while drinking the product.  You’ll get the idea.  Be careful with these videos since they’re all uploaded by different people, so the volume is different across each one.  Don’t turn the volume too high or too low.

Expect a Monday Movie next week, and hopefully the official announcement of my “secret project” around the same time!


Steampunk Reference Images (High Res)

Written February 4th, 2009
Categories: Blog
3 comments

I recently went to the museum near my house with a camera and found that they’ve got a whole truckload of old machinery from the steampunk era (1870-1920).  They’re mostly adding machines, but there’s some punch-card machines and slide-rules in there too. For those who are new to the steampunk idea, here’s a snippet from Wikipedia:

Steampunk is a subgenre of fantasy and speculative fiction that came into prominence in the 1980s and early 1990s. The term denotes works set in an era or world where steam power is still widely used-usually the 19th century, and often set in Victorian era England-but with prominent elements of either science fiction or fantasy, such as fictional technological inventions like those found in the works of H. G. Wells and Jules Verne, or real technological developments like the computer occurring at an earlier date. Other examples of steampunk contain alternate history-style presentations of “the path not taken” of such technology as dirigibles or analog computers; these frequently are presented in an idealized light, or with a presumption of functionality.

These images are generally over 1000px wide.
Thumbnails
Circular Slide Rule c1895
Pocket Table c1900
Brass Slide Rule c1700
Pocket Lord's Calculator
Pocket Calculator Slide Rule
Masive Brass Lord's Calculator
Desktop Adding Machine c1890
Primitive Computing Machine
Computer Interface 1880
Punchcard Computer c1900
Punchcard Tabulator c1880
Punchcard Tabulator Reader
Punchcard Puncher
Punchcard Tabulator c1880
Desktop Computer 1890
Calculator Keys
Desktop Programmable Computer 1930
Desktop Computer c1880

Particles Part 3

Written January 26th, 2009
Categories: Blog
No Comments »

Deflectors

Deflectors are ways of controlling particle flow by preventing them from penetrating geometry that’s supposed to be solid. But why not have an option to prevent penetration of any polygons? Because the process can become processor intensive very, very quickly. While I’m not saying you need to use deflectors sparingly, you should give 3dsMax the luxury of some approximation. If your space-ship is a flying saucer, just approximate it with a squashed sphere.

That said, let’s have a look at the various deflector types! Imagine deflectors as a combination of 2 factors; shape and functionality.

Shapes
Demonstrating deflector shapes.

Demonstrating deflector shapes.

There are three shapes in the deflector selection; spherical, planar, and universal. The first two are self-explanatory; they’re shaped as the name suggests. The universal deflectors are based on geometry that you specify. This means you can have that battle cruiser pushing asteroids out of the way perfectly. However, remember that this could tax your system heavily, so it’s a good idea to create a low-polygon mesh that can act as a proxy for the real 3d model.

In the image on the left, I show you how each of these shapes act. I’ve created mesh objects to represent the 3 deflectors in the render. The torus object is an approximated version using much fewer polygons than the rendered object has.

Functionality

Next, there are three functional flavors of deflectors; ordinary, dyna-flect, and omni-flect. The first type of deflector is a highly simplified version of the deflector idea.  Think of these as similar to our spray versus super spray concept described earlier. The next, dyna-flect, is for use with reactor objects and other reactive bodies. You’d use it when you need the target object to respond to being struck by particles (like tank armor deflecting bullets but getting dented).

Very briefly, what makes omni-flect deflectors special compared to ordinary deflectors, is that they provide many additional features. Allow me to summarize them here:

  1. Reflection parameters – the ability to tweak how “bouncy” particles are as they strike the deflector.
  2. Refraction parameters – for particles that penetrate the deflector, you can chose to have some of them follow a “tweaked” bearing. Note that reflection is calculated before refraction, so if you wanted half of the particles reflected and then the other half refracted you’ll need to set 50% reflection and 100% refraction.
  3. Friction parameters – for glancing angles and particles that’ve come to rest on the deflector, the friction parameter helps them slow to a stop. This is useful for large numbers of objects subject to gravity.
  4. Spawn reactivity – for particles that have options controlling how they spawn on collision, these parameters let you tweak that for each deflector. For example, if your sparks strike concrete, they’ll break apart and spawn more sparks, whereas if they hit the welder’s clothing, they could just stick and then die in a few frames.

Forces

Forces allow you to direct the flow of 3dsMax particles without having to bounce them around with deflectors.  Think of forces as the “go here” command to the deflector’s “don’t go there” command.  You can combine forces to create very specific and complicated effects like galaxies, tornadoes, and harsh weather effects.

You create and bind these forces in the same way that you would for a deflector.  Just select the object, click-drag to create it in your scene, and then use the “Bind Spacewarp” tool to link it into your particle system.  Let’s take a look at each type of particle emitter in 3dsMax.  To aid in visualization, I’ve included some of the images from the help document.  I’m sorry I can’t include them all; there are a lot of space warps in 3dsMax!

  1. Push – Exactly as it sounds; this force will consistently push particles in a single direction.  This force is acceleration, so the older a particle is, the faster it’ll move!
  2. Motor – Operates similarly to the push force, but it applies a rotation at the same time.  Remember spin art? It’s a lot like that.  Because the “Motor” icon rotates your particles around it’s axis, the orientation is important!
  3. Vortex – Operates essentially like a push and a motor at the same time.  It applies a “swirling” motion in order to form a funnel similar to a tornado, black hole, or water spout.
  4. Drag – Lowers the speed of particles as they age.  You know how bullets slow down quickly as they enter water?  And that’s why action heroes always jump off the boat in order to get away from the bad guys?  That’s the effect that the drag force creates.
  5. Pbomb – Provides a shockwave that blows particles apart.  Very simple to implement because it is essentially only timing and intensity parameters.
  6. Path Follow – Forces particles to follow a spline as they move.  The key to remember here is that you can either have the particles follow the path as they exit the emitter, or follow the path as they come near a certain area.
  7. Gravity – Operates exactly as it sounds.  Gravity exerts a constant, uniform pull on all particles in a given direction.  You can also exert spherical gravity, which is very fun for modeling little galaxies and watching them congeal!
  8. Wind – Wind is a lot like gravity in that it applies an omnipresent, uniform force from a direction.  However, wind has many more options for simulating turbulence and non-uniformity over time.  In conjunction with snow or blizzard particle generators, you can make some very convincing weather effects.
  9. Displace – A very fun space warp.  The displace operation will deform both particle systems and geometry!  This is a big deal because it helps you bridge the divide between special, custom objects (like your character) and particles (like rain).

Learn more about advanced particle flow on the next page!

Good News/Bad News

Written January 24th, 2009
Categories: Blog
No Comments »

Hey everyone,

This is just a quick blog update; I don’t have new tutorials today. The bad news is that by using WordPress, I’ve exposed myself to every Pyroxin, Detromethanol, and Mydixadrupin spammer on the planet. This means that my responses to post comments is going to be delayed or halted for the time being. I’m really really sorry!

The good news is that I’m experimenting with some new techniques for my Monday Movies. This means sharper, better sounding video embeds on the site! You’ll love it!

This week’s topic is going to be a fascinating look at various clay rendering techniques. I’d also like to get a particle flow primer coming down the pipe, but I’ve started playing EVE Online, which has grossly impacted my productivity.

More to follow!

AA Primer Part 1

Written January 18th, 2009
Categories: Blog
1 Comment »

AA Primer Part 2

Written January 18th, 2009
Categories: Blog
1 Comment »

Where is the Micro SD card slot on the Android G1?

Written January 11th, 2009
Categories: Blog
15 comments

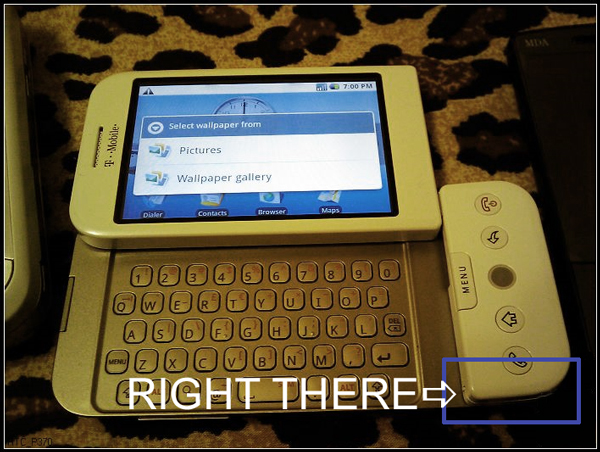
This took me way too long to find out on my own, so let me make it as clear as possible so that it never has to be asked again.

Where is the SD Card Slot?

Where is the SD Card Slot on the G1 Android?

Slide your nail under the tab just below the green “call” button, and pull off the little plastic cover (the size is about as big as the profile of a nickle).  It’ll dangle off the side of the phone, and the microSD card uses a click-in/click-out locking mechanism, so push it in and it’ll pop out.

World-Machine Colors and Mixing Tutorial

Written January 10th, 2009
Categories: Blog
No Comments »

Selections Part 2

Written January 9th, 2009
Categories: Blog
No Comments »

World-Machine 2 Tutorial En Route

Written January 8th, 2009
Categories: Blog
No Comments »

Hey gang,

I’ve got another World-Machine 2 tutorial coming down the pipe that I know is going to rock your socks.

Unfortunately, my monitor recently made a unilateral decision to stop supporting resolutions above 1024×768, so I’ll have to figure out what I’m going to do about that. It’s a 3-year-old 915N. At some $400 when I bought it, I expected it to perform at least as well as my dad’s GEM ($500, 10-years-strong). I think I’ll go with a different brand next time (no hard feelings).

In the meantime, I added a PayPal “Donate” button to the right-hand margin. The fact is that adverts alone don’t bring in much revenue because you tech-savvy people don’t even see them anymore. Maybe in another 10 years I might’ve made enough money from this blog to buy gas to drive down to the municipal dump to find a thrown-away CRT. This doesn’t begin to take into account the money I pay the Russian mob for hosting. If one in a hundred people would drop me a few bucks I’d be able to splurge on a new monitor (hint hint).

That said, stay tuned!

Free Procedural Texture Map

Written December 25th, 2008
Categories: Blog
2 comments

Jeremy Ylilammi released a new version of his noise map.  In case you’re not familiar with it, Bercon’s noise implementation is a fresh new procedural map for 3dsMax.  You can get a nearly limitless variety of noise shapes using this one texture. Best of all, it’s free!

Site Optimization Now Underway

Written December 24th, 2008
Categories: Blog
No Comments »

Well, I’ve begun to optimize the page a bit.  There’s pleanty of awesome tutorials and videos on the site, but I’m getting the impression that people are having trouble finding it.  So to alleviate the problem, I’ve started cleaning up the site a little with UI items like multi-page navigation at the bottom and moving some of my larger posts into pages that are listed on the right.

This is really going to spruce things up a little, but if you get dead links please sit tight.  They usually go away in a few minutes because I don’t leave the site in limbo for more than a 10 minute stretch.

Keep Watching, I Might Do A Trick

Written December 18th, 2008
Categories: Blog
No Comments »

Hey everyone,

Sorry I’ve been out of contact lately.  It’s been a crazy week of work and dealing with real-life stuff..  The weather here in San Francisco has gotten much colder, so I can’t ride my bike to work anymore; I have to carpool.  And that means getting up earlier and coming home later.  I’m also sick of sleeping on two inches of foam, so I’m buying a real mattress which is a hassle all by itself.  Finally, I’m working on two awesome new websites, which I’ll announce when they’re closer to being finished.

In the meantime, stay tuned. This weekend’s looking pretty free for me. Some of my bigger side projects are taking a breather (except for the 2 new websites), meaning I should have time for another written tutorial.  I also feel guilty for not making any posts this week except for my (late) Monday Movie.  The tutorial will probably be a “part 2” to the first mental ray lighting tutorial I did.  That one was a little on the “walkthrough” side and didn’t cover as much material as I’d wanted, so this next one will be a little more abstract and talk about light types.

Cheers!

World Machine 2 Review

Written December 13th, 2008
Categories: Blog
1 Comment »

Hey Everyone, I’ve been playing around with World-Machine 2 for the last few days, and I’m impressed with a lot of the changes that have been made. I had the pleasure of using the beta product, and when version 1 came out I bought it because it turned out to be a good pipeline addition. Now that version 2 has been released, I think it’s time to write a quick review!
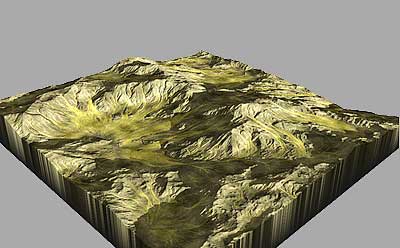
The World Machine Node Graph

High Resolution, Photo-Realistic Terrain Generation

For those who have never heard of it, World-Machine is a program that lets you generate procedural terrains. Hand painting heightfields in Photoshop or a level editor (barf) is tedious and usually doesn’t yield realistic results. Several programs include some procedural landscape generation ability like Vue 7 Infinite, by e-on software, and Terragen, by Planetside. The goal of World-Machine is to build the heightfield and save it to a .ter (for terragen) or .tif (for anything else), and then import it when needed. All of the images in this post are from World-Machine; imagine how good these look when they’re rendered! World-Machine is, hands down, the most robust program for generating landscapes.

  • There are almost a dozen different noise generating algorithms to choose from. Most are exotic delicacies like Voronoi and custom generators, but there are several variations of classic Perlin, too.
  • There are now four different flavors of natural effects; thermal weathering, coastal erosion, regular erosion, and snow capping. Each of these gives you an unusual level of control (like changing how far sediment travels during erosion). Every other program I’ve ever used gives you one erosion tool and it’s usually ugly.
  • There are now native drawing tools for roads, rivers, and custom landscape features.
  • Native texture generation support has been added, too. Finally! We can use information from within World-Machine to generate textures based on height, slope, erosion deposition, and more.
  • There are now 5 view modes instead of 3. Device view (the graph editor), layout view, explorer view, 3d view, and 2d view.
  • There are several smaller UI changes like creating device groups and setting the water level.

Overall, I like World-Machine because many parts of the program have tooltips, popups, and text notes built in the UI. These are actually less obtrusive than you might think, and they keep you from having to refer to the documentation constantly. You can actually get pretty handy with World-Machine without ever opening the help file.
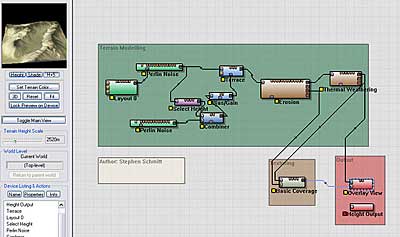
The World Machine Node Graph

The World Machine Node Graph

The recent upgrade brings in a completely new level of terrain control now that it allows you to paint heightfields directly in the program to tweak the landscape to your needs. It beats having to draw up a new map in Photoshop and bring it over via a custom input node. Unfortunately, while this is a welcome feature, the integration into the UI is a little awkward. You have to create a special input node and go to the layout view to draw your shapes. The available options are boxes, circles, polygons (like in Photoshop), and Bezier lines. That’s fair enough. But editing these shapes afterward is non-obvious, and the internal UI hints fall apart at about this point. This doesn’t make the feature entirely useless, but it does mean that you’ll have to wade through the help file looking for guidance. And no one likes that. I think version 3 of World-Machine will have this interface cleaned up and better understandable at a glance.

Am I complaining that an advanced feature of an advanced program is hard to use? Yes.  And, astonishingly, this is pretty much my only gripe.

For everything else, It’s really surprising how easy it is to accomplish some very difficult techniques. Node graphs are usually pretty scary, but Stephen has made this one pretty user friendly. The default document explains it all; create a noise generator, run it through a modifier node, and then dump it into an output node to save it to a file. From this basic idea, all awesome things are born.

Overall the learning curve for using World-Machine isn’t steep.

Concerning performance, I’m satisfied. Not blown away- but well satisfied. I know that generating heightfields is a tough process, and eroding them so gently is nothing short of a miracle. However, keep in mind that it’s a lot like rendering; it’s going to take 2 minutes for a medium heightfield and 10 minutes for a big one. The greater the complexity, the longer it takes.

Whining aside, at the end of the day what matters is preview performance, and World-Machine delivers on that front.

At about $60 USD this program’s well priced. It does one thing and does it very well making it (in my opinion) a bargain. There’s also a pro version that has multi-threading capabilities and a few other features that cater to high-end needs. I purchased the standard version since I don’t need to be on the bleeding edge and I still get to render 8192×8192 with the standard version.

I encourage you to check out the website and download the demo version. I verify that the install is clean, and easy to remove. The only limitation is that you cannot create terrains over 512×512 in size. While you could side-step this limitation by just creating tiled terrains and stitching them together in another program, it’s actually more of a pain in the ass than you’d think.

Go download the trial and test it out. You won’t be disappointed.

The World Machine Node Graph

Simply Amazing

ConceptArt.org: For All Your Inspirational Needs

Written December 10th, 2008
Categories: Blog
No Comments »

A friend at work turned me over to this website recently, and I was pretty blown away. It’s got a deep collection of concept art that is sure to give you that little boost of inspiration whenever you need it. Of course, don’t copy any one concept precisely or you risk copyright issues. But it’s always nice to find that “perfect robot arm example” to work off of. Don’t forget to check out their forums section, which has over a million posts. From my exploration, I gather that this is a vibrant 2d drawing and digital painting community.

Have a look when you get a chance!
Click Here to Check It Out…


©2023 MrBluesummers.com